Showing posts with label THINGS I'VE MADE. Show all posts

Sunday, December 20, 2009

Another Show and Tell: New Outfit For My Young Miss


Just had to get a little show off picture of the outfit I made for my daughter(Young Miss) from scraps from the flannel I used to make sheets for the bed......70" wide material gives you the luxury of some good sized scraps to work with.....So from my scrap stash This emerged. The skirt is a multi paneled Vogue( I will have to post the number later as my sewing room is being reworked and it is MIA in the piles somewhere, AAUUGGHH!).. Anyway we are not skinny misses in the this house by any means..As my lovey hubby likes to put it....G-d  did not skimp on the portions in our house. Anyway this pattern IS A KEEPER..It is awesome fantastic for curvier gals....The cape had no pattern, I just winged it. It is lined with lining from the stash ..And this trim was picked up at a thrift store about 7 years ago for $1.00... It had many many yards on it..Still some left......Anyway here she is..........
Disclaimer: this girl is in desperate need of a haircut!!!

Pretty cute for scrap yah? Still think it needs a different top.Since the red are not quite right together. But the hat from her wardrobe is a perfect match.New blouse Soon. Total cost to make was $7.00....See I am out to prove to all the nehsayers that that sewing CAN be cheaper than buying and you get one of a kind and cuter stuff to boot! Heres to creativity. THERE!(sticking tongue out)

Hey on Tuesday you can check out other peoples DIY projects over here

Friday, December 18, 2009

Sew And Tell Friday: Dec 18, 2009

This is my first time doing Sew And Tell. over at the site amylouwho.com.

 I spent most of the week working on a project for someone I don't even know. I found a little girl on the website Wish Upon A hero........The link is on my side bar under my Etsy display. She is a "little" person. A anachondriplasia dwarf (excuse me if  I got that wrong) and as she is getting older she is having a more difficult time finding clothes. So having just a  little something of an idea how hard it is to go to school everyday and not be able to get clothes to fit and feeling like you don't fit in, We decide to grant her wish for new clothes. So here is the hitch, I am in the middle of a sewing room make-over and loose the cord for the camera so I cannot download any photos.............So I have none of those items I worked on this week to show... I am hoping and praying her mother takes some photos and sends them my way so I can post them to show.  I just hope and pray they fit as i was working long distance with only measurements, I of course did not take............Heres hoping they all fit.............Anyway so I did get a couple of other projects done this week. Not as much as I should have but anyway.


     First I made another set of bedsheets from mill ends(from top manufacturers sometimes) that are sold at our Wal-Mart ( our Wal-Mart is one of the few left in the country who have a fabric department, Thank you Tongan and Samoan lady sewer who have threated to boycott and put Wal-Mart out of business here if they don't keep the fabric department here. We love you!!!)   .... anyway  a   couple of months ago......I found three bolts of Portugese 18 ounce velvet finish flannel.......This is the same stuff that they make set sheets out of and get almost $300.00 a set.. And score!! It was only $2.00 a yd... I almost peed myself! ALMOST!!!!.......So I made sheets sets(fitted, flat and 4 pillow case sets of each material).....This stuff is so yummy to sleep on no one wants to get out of bed. And the cat Now REFUSES to get out.. Stinker!!!


And this is a denim rug in progress made from the waistbands of old blue jeans, went as far as I could this week, but I am in need of way more......Anyone got any any old jeans that are to far gone to wear, I will gladly take them off your hands. Just let me know.


And last but not least is this set of pillows...This was the last of this material..Boo Who!! Another bargain of monumential proportions.


I promise I will have better pictures next week. I kind of winging it this week.  Guess this is some progress from the me and the Crew........BYE.

Tutorial: Linen Vintage Look Bell Pull


This bell pull is any easy beginner level project. It takes no more than 45 minutes to 1 hr tops to complete a pair of these. They look great displayed on double front doors, one on each. They also look great on either side of a mantel or just on each door of your home....The linen look it just perfect for a modern classic look.
These cost me about $4.00 a set to make. My Supplies were purchased at Wal-mart. May run a little more if purchased else where.

Disclaimer here: I am not  now, or ever was a hand model . These are just poor ole working girl hands. So just get use to it!

So here we go:        To make a set of two You will need :2 1/2 yds of Red trim Burlap Upholstery

                                                                                       webbing (used in upholstery to weave under the
                                                                                            chair to hold seats and backing in place)
                                                     
                                                                                         Red grosgrain 1/2" wide ribbon about 8 yds

                                                                                         Jingle bells : 20   that are 1 1/4" diameter
                                                                                          or 40 that are 1/2"  diameter

                                                                                             matching beige thread

This is what your material will look like.     

Now to start sewing:

Turn one end of your material down 1/2" and stitch close as you can to the folded edge.
Once you've done that turn the fabric to the wrong side with the center slit area matching the center of the material from side to side to form a V shape at the bottom edge of the bell pull. Pin as shown. Stitch across the straight edge. (some people will say that you should do a true miter instead, but it does not work as well. This method keeps seam bulge from showing to the front and also keeps you from having to trim too close which with this type of material will cause fraveling that might be fatal to this project) This method I am showing you also gives the piece the weight it needs on the end to hang straight otherwise it might twist when hanging.


                                                               right side after sewing straight  across.
Now measure from tip end out to 38" and cut other end straight.


Fold the cut end 1/2" to back side and stitch as close to folded edge as you can across.

Once that is done. measure out a 2" long loop of grosgrain (so 4" total)

Pin and
 stitch to back side in the middle where you had stitched before. Flip work to front side and bend grosgrain ribbon over the edge and stitch one more time. You will be able to see what I mean in the next photo.

Then fold to back side 1 1/2" to form a pocket and stitch to where the loop will be hanging facing up so you can hang your pull.

Now measure the miter  type end up 2 1/4" from tip of V and mark with chalk.This will be the placement for the first bell or bellls.

Then you will proceed to mark bell placement with chalk working to the top with each being 3" apart .

Take a workable length of grosgrain and cut into a v the end so it will go through a large eye needle easily.

Double over thread. (Big Tip: make sure your needle is not so big it won't go through the back end of the bells.. Don't usually have to worry about this with the larger size bell, but you might with the smaller ones.)

Run thread from back to front and leave about a 4" tail to back.

Just like that.

Now thread one large or two small bells on needle and thread and pull them down to the fabric.,

Run needle through front to back of work, making the bells snug to the front. Leave another end with at least 4" and cut. You will then tie off in a double knot to the back of the work. Remember to hold a knot well it is Right over left and then left over right.  Repeat the process for each chalk mark until you have 10 placements down the front. Repeat for the second pull same as the first. Or make many sets as I did and do all the steps assembly line style. Goes much faster that way!


And no my door is NOT dirty. It has a linen look glazing technique on it.

Hang and enjoy, by using loop in back and a nail, or those commando hooks that don't marr walls. Or make a decorative hanger or dowel to run through the top pocket and hang. I love these. They are classy, easy and inexpensive. What could be better. If something is not clear or you have questions or comments please feel free. We love comments. Makes us feel loved!
 

Thursday, September 10, 2009

Tutorial Tuesday / DOOR HALL TREE FROM TRASH

I am sorry we are late with this post this week. Things will get better I promise.


ASPTL


 Just a precaution before we continue. All woodworking projects are potentially dangerous. DO NOT attempt if you not familiar with using tools or are not willing to accept risks...ALWAYS WEAR PROTECTIVE EYE WEAR and know and learn how to use your tools properly according to manufacturers instructions.

We share projects under a commons license ideal and all activities are at the risk of participant.

Now that that is out of the way:
Here we go:
I am just going to give you a starting taste of some of the things we have been making for the last 7 years. We will start with this cute little number my husband made from found objects. The list of supplies is:
1. old  solid wood door (do not attempt this project with a hollow core door) with criss cross lattice style window (we removed the glass and it will later be recycled into pieces for jewlery)
2. old kitchen cabinet, upper cabinet
3.4 matching bun legs salvedged from old sofa
4. old wooden vent a hood (goes above stove)
5.two- 1/2" to 1/4" thick scraps of wood, wide enough to fit under kitchen cabinet and long enough for the length on one an the other wide enough and long enough to hang over 1 1/4" to 2" on three sides of upper cabinet
6. scavenged knobs
7. paint (for this project we use old miscolored paints as base coat and Wal-mart custom mix outdoor semi-gloss paint, black ...mix code is one gallon starter and 64 y measure black only tint)
8. screws
9. brads
10. wood putty
11.electric screwdriver
12. jigsaw
13. circular saw
14. hammer
15. paint brushes ( we use the multi 6 pack found at Family Dollar stores, best price for the quality anywhere)
16. optional: poly acrylic finish, matte or gloss depending on the look you want.
17. handle face plate
18. set of matching hooks, single or double.
19. optional: chicken wire


First gather all your supplies, making sure the cabinet you have secured for use on the bottom of this hall tree is the width of the door or smaller (nothing wider). Same goes for the hood (if you can find one it is not required to make a Hall tree if you don't like the look or cannot find one.)
Here are all of our supplies:
Next you will bust out all the glass(if you choose you can leave the glass, but be warned it is more dangerous if you have children. Also makes the piece more difficult to work on and moving a more cautious task.) We choose to take the glass out, as the market we sell in, things with mustard colors DO NOT SELL WELL. Save the glass if you make jewlery, otherwise recycle it or put it up on Freecycle so others may put it to good use. Remove the hardware from door(handle , both sides)
Then we cut a board the width and length of the bottom cabinet. Attatch the bun legs to board with buns sticking out slightly from the corner edges of front and side of board
Back buns need to be tucked in and set so that when the board is up against the door the board butts up with no gaps next to the door. Use several long grabber screws for each bun leg attachment. Screw through the top of the board to do this.
Next you will open doors of cabinet and screw from the inside, attaching the cabinet to the board which now has legs. Screw in each corner and a couple of places in the middle. Counter sink the screws(in other words sink them deep enough that the cap of the screw head is below the wood. This is done so the cabinet will have no rough screw tops to catch on items stored inside. The counter sunk screw holes will be covered with wood putty and smoothed when dried (sanded) to make a smooth shelf at bottom of cabinet. Then you will attach the cabinet to the door by again screwing through the cabinet back attaching the cabinet to the door....Make sure door is in standing position as well as cabinet. Align the cabinet centered on the door center (in other words mark both the door vertical center and the cabinet vertical center and line them up so that when you attach them, your piece will be balanced on each side.Counter sink screws slightly and treat as the bottom screws.Make sure when working on this portion that you work on a level floor and that the door is level to the floor. Once cabinet is attached, mark and cut board to place on top of cabinet (make sure this is a nice piece of wood as it will be seen, also once cut, it is nicer if the three sides that will face outward have a routered edge for a more finished look and feel.) Board measurements should be size of upper part of cabinet plus over hang on two sides and front. overhang can be 1 1/4" to 2" but should not be wider finished than the door across measurment. Router if desired and attach to top by screwing from under side of cabinet top. Make sure screws are not too long to go through the top and mare the cabinet top.
Next attach the vent a hood to top of door by screwing from back of door through to hood. Again make sure your screws are not too long to mare the hood. Make sure screws are slightly counter sunk on back of door as most likely this piece will always sit up again a wall and you would not want walls mared. We added extra wood to the back of the door to make it taller on this piece since the vent a hood was large, to counter it and make it more attractive. You do not have to attach a vent a hood. Any moulding trims could be attractively stacked and attached to finish the top. If you have a door with missing window but it is not criss cross pattern like this one you can also attach chicken wire to the back and staple for a country look (make sure all staples are hammered in securely and all edges of chicken wire are hammered in as well to prevent walls from becoming scratched....This should of course be a last step after painting and finishing the entire piece (inside and out, front and back and make sure you get all the way around those bun legs. You never know when some little rug rat may be crawling along and checking out your work.) Putty all holes except the hole where the door handle was. Wait to dry then sand smooth. Use junk paint as first coat of paint. Let dry. Second and third coats black paint. Dry in between coats throughly.  Apply one to two coats of poly acrylic finish coat if desired. Comes in  glossy or matte. We use matte finish.
 
Attach cover plate over door knob hole in front only. Add knobs (hardware) and Double hooks to top as shown in picture. (DISCLAIMER: as with ANY LARGE HEAVY PIECE OF FURNITURE, please if you have small children living in  or visiting your home, PLEASE MAKE SURE TO ANCHOR LARGE PIECES OF FURNITURE TO WALLS APPROPRIATELY to avoid crushing accidents PLEASE) This item is made very bottom heavy and would be very difficult to tip, but you should never take chances, especially if you have children who like to climb, as it only takes once and a life time of regret.)  And lastly a picture of our new creation once delivered to Home Again Midvale, Utah location. This item is sold. Sold in three days..We sell lots of Hall Trees. Each one is different and unique. Hope you enjoyed this tutorial and if you have any questions please e-mail or  feel free to leave a comment.  If you use our tutorial and create your own Hall tree from it send us pictures and we will gladly post them on our blog. Happy Trash Hunting, Salvedging, and wood working all!!
The pumpkin picture window in this picture is also our creation and in two weeks our tutorial will be on how to reverse paint on vintage and antique windows. See you then......Also don't forget to sign up as a new member on this blog and e-mail me your physical address and I will send the first 100 new members a free gift. Also look for our free give-aways to members posted on Mondays.

Monday, September 7, 2009

Here is the Free New Member Giveaway Item

Well here it is Ladies. If you follow the instructions on the new member post and e-mail me with your physical address I will mail to the first one hundred members of this blog a hand made one of a kind zipper pouch or more if you get other to sign up.Follow the instrcutions on the new member post several down from this one.....When you e-mail me give me the style you like and colors that you prefer and I will try to accomodate(no guarantess but I will do my best)...So here they are..Let me know which style you like best...I look forward to hearing from you!
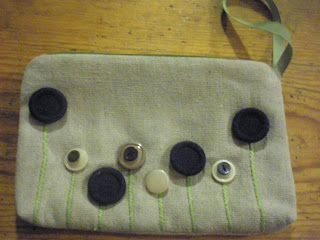
Saturday, August 29, 2009

Check back on Monday, Monday, Monday!!!

Anyone who currently shows as followers on my blog or signs up will receive a new member gift,(up to the first 100 members) to try to get this blog a rockin with our new direction of all creative love starting Monday. The item (handmade by me of course) will be on display on Mondays blog (Labor Day 2009). In order to receive your free gift all you have to do is:

1.put your pretty little picture up in my member/follower little
square to the side right hand side of my blog, linked to your e-
mail or blog(you know how to do this)

2. blog on your blog about this give away, link back to this blog(nothing fancy here just a one line mention is all really) or e-mail someone about this give away and be able to show me the e-mail.

3. e-mail me at mrspinsneedles@q.com or greenhoneyhive.gmail.com
with your full legal name and your home residence address with
zipcode. Also include the link to the mention of this give away on your blog or a copy of e-mail sent to, well ,anyone.

4.Leave a comment on this blog at least once a week for a minimum of two consecutive weeks.


5. BONUS: If you want to score more than one free gift get someone
else to also sign up as member and put in the e-mail you send me,
their name and your relationship(friend, mother, sis, father,whatever) no children under 13 for this free give away please and only one person per household address eligible for free gift or bonuses. In other words you must get someone that does not live in your household to sign up as a member of this blog in order to get additional free gifts...Hope that is clear. If not ask.

6. Maximum amount of free gifts per one person in household is 3 (three) Thank You.

 7.This offer is limited to those who live in the 48 contiguous United States only please.


8. And lastly this is limited to the first one hundred new
members,so hurry if you want your  sweet  free goodies!

Disclaimer, no value is inferred or implied. If offers of this kind are illegal in your state, city, county or district please disregard and do not participate...I will not be held responsible for any taxes, fees, or legal obligations attached to this gift. They are the recipients sole responsibilty.No guarantees or warranties implied...Any lossesor non receipt of gift does not hold this blog or its owner or Blogspot or its companies or owner legally liable.  Thank You

See you on Monday all my crafty fun loving friends!!!

Thursday, August 27, 2009

THE FLIRTY APRON "I LOVE LUCY" SWAP

Well my swap partner finally got her apron. I was getting so stinking over excited about it. I did not post what I made since it was suppose to be a secret....So my swap partner was Betty aka Fudgie. Now let me tell you this swap for me was not easy to figure out what to send. Somehow I had misread the info that Shawnee had sent me and I thought it said that my swap partner DID NOT LIKE VINTAGE. All I could think is What? What's up with that? No way could I ask Fudgie to comfirm. It's suppose to be a secret swap right? So I rack my brain trying to think how I am going to do "I Love Lucy" with a modern spin. Oh, and to make things more of a challenge for myself I had already signed up for my six month pledge to refashion, not buy anything new and use only what I had. I knew my secret swapper was really jonesen for some "I Love Lucy" material on her apron, from her blog,but that was not going to happen....Sorry Fudgie. Oh! What to do? I watch a lot of "I Love Lucy" cd's from the library(Let me tell you, I had no idea how few of these I had actually ever watched as a child). Well after much back and forth and then hitting the unfinished white prom dress(that by the magic of the Salt Lake City clean up piles I had managed to snag in a clean box of unwanted half finished projects and scraps love, SCORE!!!) and seeing the Lucy episode with the Carmen Miranda song, sweet love I had my answer. So here it is in all it's upcycled, recycled "I Love Lucy" glory.


Well its modern, its flirty, as Fudgie says in a hoochie mama sort of way, and it screams Mamae Eu Quero. Si?

Monday, July 20, 2009

I Pledged To Refashion with Wardrobe Refashion

Hi all,

The Pledge
I Kimberly Cherrine-Bell pledge that I shall abstain from the purchase of "new" manufactured items of clothing, for the period of 6 months. I pledge that I shall refashion, renovate, recycle preloved items for myself with my own hands in fabric, yarn or other medium for the term of my contract. I pledge that I will share the love and post a photo of my refashioned, renovoted, recycled, crafted or created item of clothing on the Wardrobe Refashion blog, so that others may share the joy that thy thriftiness brings! Signed,Kimberly Cherrine-Bell

Sunday, July 19, 2009

Got A Few Things Done Besides Nursing and Cooking Duties

Hey all,

This week was a little better, although I somehow managed to lose my drivers license,(never done that before!! Guess there is a first time for everything.). Nursing duty is still underway and I am not getting done what I should. Somehow I did manage to slip in a bit of sewing. All of it was done using scraps from my stash. Of course It does not even begin to scrape the top of the iceburg, so to speak. I could sew just off my scrap piles for the next year alone, I am sure. So here is the first item I finished. It is going to Etsy to be sold. Made from my linen(and this is some of the nice stuff) and vintage ribbon and trims stash. I think it is just lovely.


Then I also so made this mother/daughter set that was going to be used as a gift. And then I found out that the party I was making this for does not like aprons. What? Who keeps chicken, loves baking, cooking and being artsy and does not like aprons? Oh well. So this set will be sold too. This set was made again from my stash. The blue material was from a duvet cover inner material from my home that did not fit my decor anymore. The yo-yo's were from some tiny scraps from the stash that were only big enough for quilting, Barbie clothes or such.(I use EVERYTHING until the pieces are so small you can get nothing from them). The bias tape was from my stash and is actually vintage stuff. Buttons were from thirty year old stash


I will post more tomorrow. Bye loves Kim